January 1, 2017
This article describes one way you can connect IIS to Tomcat on Windows and delegate Single Sign On authentication to IIS.
Note: Microsoft Edge is not supported for single sign on
Prerequisites
This example assumes you already have the following in place;
- A Windows 2012 or 2012 R2 server that is a member of your Active Directory. This example assumes your Active Directory domain is named example.com in DNS and EXAMPLE in NetBIOS (if you still use that). You will need full administration rights on this server.
- The server has the “Application Server” Role installed. At a minimum this Role also needs the “.NET Framework 3.5.1” Role Service installed.
- The server has the “Web Server (IIS)” Role installed. At a minimum this Role also needs the “Windows Authentication”, “Request Filtering”, “.NET Extensibility” and “IIS Management Console” Role Services installed. ** We recommend WebDAV role service is not enabled.
- The server should have one or more Tomcat services installed each successfully running a different i-lign instance. This example uses two instances, but should easily work with any number.
- A DNS alias (ie CNAME record) set up for each i-lign instance pointing at the server. For this example we will use ilignproduction.example.com and iligntesting.example.com.
- The BonCode AJP Connector downloaded from http://www.boncode.net/boncode-connector. Note: don’t install this yet.
- Some understanding of installing i-lign instances , as well as some basic IIS, HTTP and TCP/IP knowledge.
Recommended extras
- We recommend you install a good text editor that can highlight syntax when editing XML files. Notepad++ is a good example.
i-lign instance information
In this example we have set up each i-lign instance to use the following Tomcat port numbers:
Instance Name HTTP Port AJP Port Shutdown port ilign_production 8080 8009 8005 ilign_training 8081 8010 8006 ilign_test 8181 8011 8007
Configuring the i-lign instances
- Stop both i-lign instances.
- Create an empty subdirectory in each instances Tomcat directory to act as the physical path for an IIS web site we will create later. In this example we will name the subdirectory iis-site.
- Configure the AJP connector of each instance to listen only on localhost and to trust IIS to authenticate incoming requests. In each instance directory edit the conf\server.xml file and add > address=“localhost” tomcatAuthentication=“false”
to the AJP Connector element. For example the Connector for ilign_production will look like:
<!-- Define an AJP 1.3 Connector on port 8009 -->
 <Connector port="8009" protocol="AJP/1.3" redirectPort="8443"
    address="localhost" tomcatAuthentication="false" />
- Start both i-lign instances.
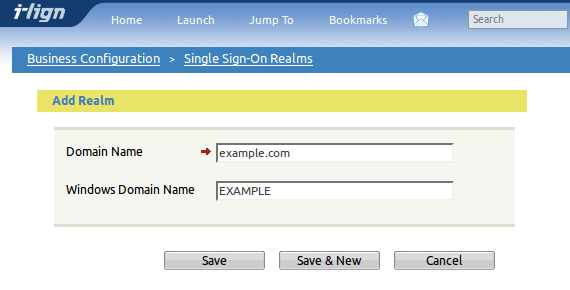
- For each i-lign instance, log in as a superuser and configure the security realms for single sign on. eg for the production instance navigate to http://ilignproduction.example.com:8080/viewRealmList.do (or choose Jump to -> Set-up & Configuration -> Single Sign-On Realms).
Create a new realm entering your Active Directory DNS domain as Domain Name and optionally your domains NetBIOS name as Windows Domain Name:
Configuring IIS
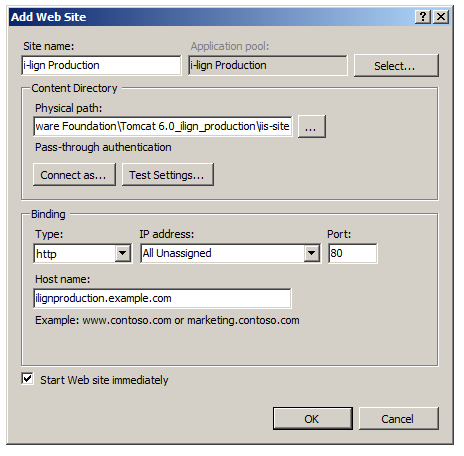
Add a new web site for each i-lign instance. Use the iis-site subdirectory created earlier as the Physical Path, and the DNS alias as the Host Name eg: image
For each web site, configure the Authentication options:
- Disable Anonymous Authetication
- Enable Windows Authentication
On Windows Server 2008R2 using IIS7 or IIS7.5, ensure the option for Identify within the i-lign application pool is set to Network Service.
Installing the AJP Connector
- From the BonCode AJP Connector download, start the Connector_Setup.exe installer and continue past accepting the license to reach the first questions…
- When asked where Apache Tomcat is located, accept the defaults of localhost and port 8009. We will change the AJP port for other instances later.
- Change the Remote Access to Apache Tomcat to disable access to the Administrative pages.
- Accept the defaults for Settings Options.
- When asked whether All sites or just specific sites should be made available, choose specific sites.
- Select the i-lign Production and i-lign Testing sites, and deselect any non i-lign sites (eg the Default Web Site).
- When asked about selecting handler mappings, deselect the JSP and CFM/CFC options, and select the Servlet option to pass all traffic via a wildcard.
- Choose Enable IIS Sub Configuration. This is required so that any additional i-lign instances can have unique AJP ports.
- Finish the installation. If asked don’t restart the server just yet.
- Change the AJP port in each i-lign web site to match its Tomcat port number. In this example, we won’t need to change the i-lign Production port as it was using the default 8009 port, but the i-lign Testing port will need to be changed to 8010.In each instances Tomcat directory, edit the BonCodeAJP13.settings file in the instances iis-site\BIN subdirectory to change the port number.
- If asked previously, now would be a good time to restart the server.
Wrapping up
Your users should now be able to transparently authenticate to i-lign without seeing a login form. It is still possible to connect a browser to the Tomcat HTTP ports (eg 8080) and login via a password from the i-lign account database. This is a useful alternative for users outside your domain, or for troubleshooting connectivity problems.
Troubleshooting intermittant Connection Errors
In some cases very large authorization packets with sizes of more than 8K are generated i.e. users working over the VPN or enabling secure HTTPS communication along with single sign on and this results in generating ISS Generic Connector Error.
The default packet size is 8192 and maximum size is 65536 which defines the size of packets exchanged between IIS and Tomcat in bytes.
To change the BonCode connector, add or alter the PacketSize setting
<PacketSize>65536</PacketSize>
in BonCodeAJP13.settings file and normally it locates at C:\Program Files\Apache Software Foundation\Tomcat 8.5\iis\BIN
and adding packetSize to AJP 1.3 Connector definition
<Connector port="8009" protocol="AJP/1.3" redirectPort="8443" tomcatAuthentication="false" packetSize="65536"/>
Notes for Firefox or Chrome users
You may need some extra configuration steps for browsers like Firefox or Chrome to trust the authentication negotiation protocols over a non SSL connection. Contact us if that is the case.