July 25, 2022
Information on how to import updated existing risks and new risks into multiple projects / programmes from a csv file.
You can use a spreadsheet (converted into a csv file) to:
- Import new risks
- Update existing risks and add new ones
from Business Configuration.
This tutorial outlines how to update existing risks and add new ones via an import. If you just want to import new risks, then see this tutorial.
It’s important to fully understand how your import works before carrying it out in your live i-lign instance. Updating existing risks for example involves removing or changing existing information.
We strongly recommend testing the upload on a test instance if you are not familiar with the way the import works. Please contact us via support@ilign.com to request a temporary test instance containing your production data.
Overall process
The process for updating existing risks via an import involves a number of steps. You’ll need to:
- Export your current risk information (a csv file).
- Convert your csv file into a spreadsheet.
- Update your risk data as required, including adding any new risks
- Convert your spreadsheet into a csv file.
- Import this csv into your project.
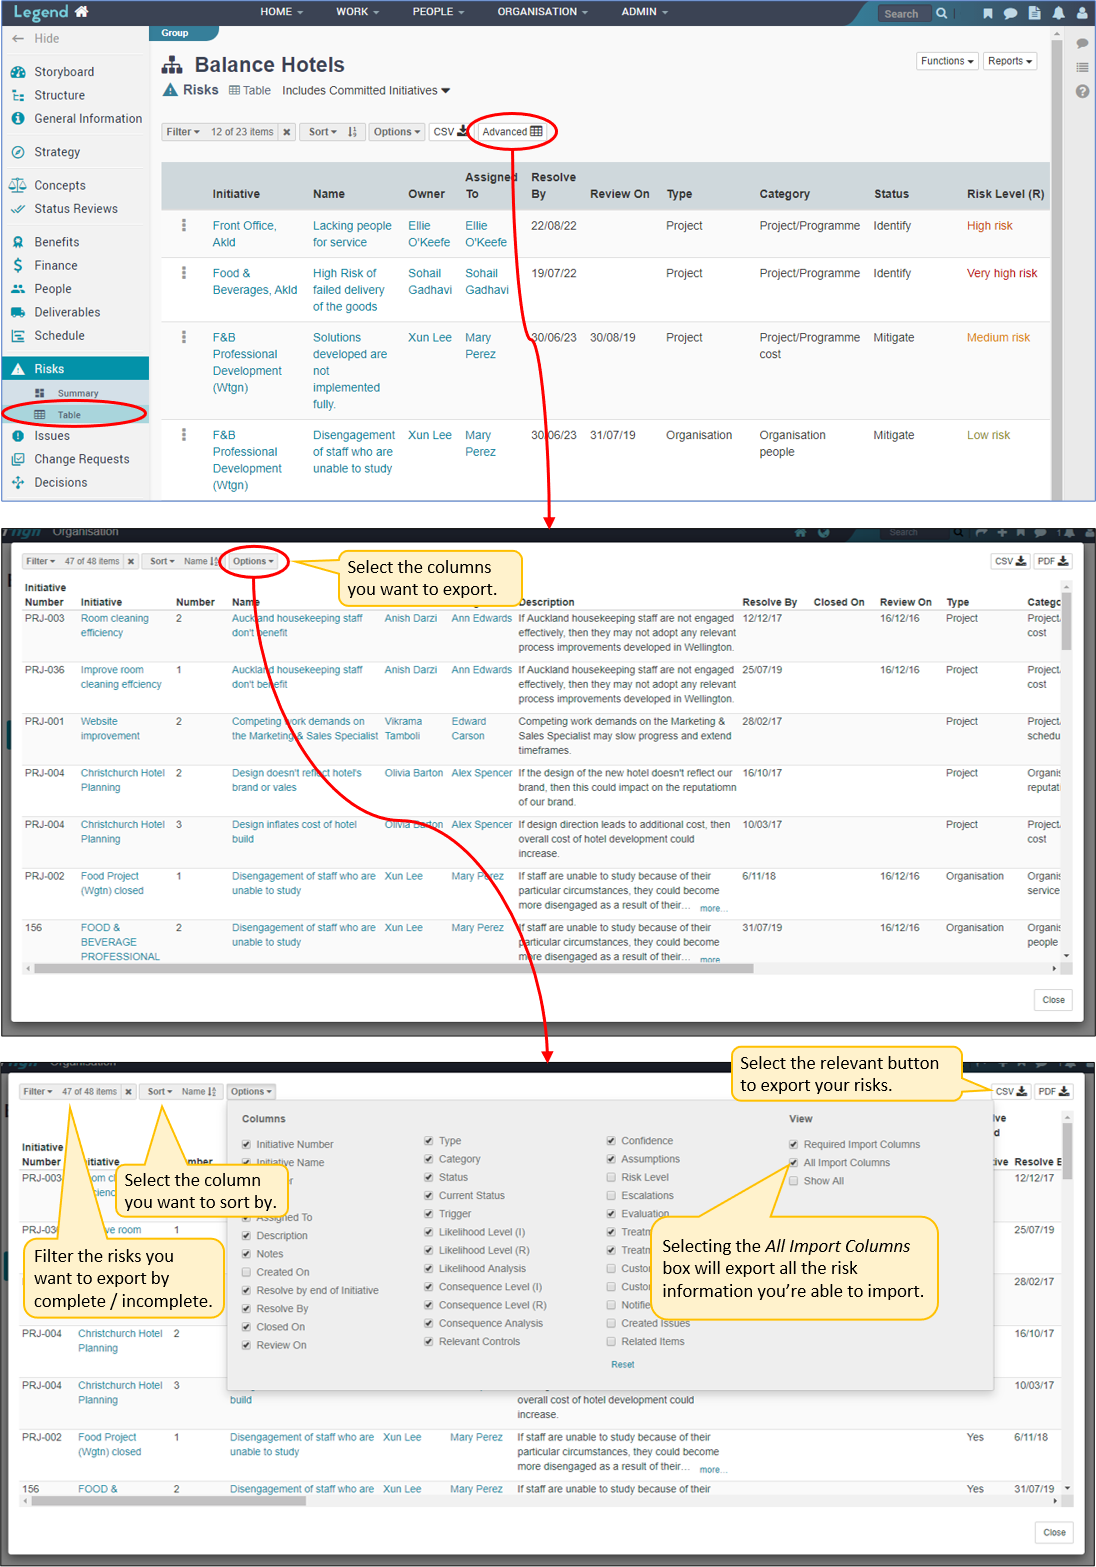
Export your current risk information
Navigate to the relevant group or portfolio and then select the Table view of the Risks tab.
Convert your csv file into a spreadsheet
Convert your csv file into a spreadsheet eg a Microsoft Excel spreadsheet or Google sheet. (Note that in some situations this conversion is done automatically.)
Update your risk information
Imported information replaces existing information. If existing information is removed from the import spreadsheet, then the import process will delete this information in i-lign. The exception is information in columns which are not included in the import. For example if your import spreadsheet doesn’t contain the column ‘Notes’, then existing risk information in the ‘Notes’ field in i-lign will not be deleted.
There are 2 ways to update your risk information. You can either:
Update the spreadsheet you’ve exported and converted.
or
Download a standard spreadsheet and copy across the data from the spreadsheet you’ve exported and converted. (Eg if you are potentially making a lot of changes and adding new risks).
Update the spreadsheet you’ve exported and converted
There are number of things you need to be aware of when directly updating the spreadsheet you’ve converted.
Mandatory fields
The following columns require information for each row:
- Class (Enter either ‘Project’ or ‘Programme’)
- Initiative Number (Unless you don’t have one)
- Initiative Name (If you don’t have a Number)
- Number
- Name
- Owner
- Assigned To
- Category
- Type
- Resolve by end of initiative (‘y’ or ‘n’)
- Resolve By (Mandatory if you have entered ‘n’ in the ‘Resolve by end of project’ column. Note that if you enter ‘y’ in the ‘Resolve by end of project’ column, then this date will be ignored and the date the project ends added instead.)
- Status
Dropdown box information
Some of the columns are populated by dropdown boxes in the application. This means that information in these columns must contain one of the options from the relevant dropdown box. The wording used must be exactly the same as displayed in the dropdown box. To see what text should be used, go to a risk in the application and select the edit function. The following columns are populated from dropdown boxes:
- Category
- Type
- Status
- Likelihood Level (I)
- Likelihood Level (R)
- Consequence Level (I)
- Consequence Level (R)
Date information
Use the following format: dd/mm/yy.
Names of People
Enter people’s names as they are displayed in the application to ensure the name is recognised.
Treatments
If you are adding more than one treatment, separate the treatments with a space or new line followed by underscore semicolon underscore then a space or new line eg:
Treatment 1 text
_;_
Treatment 2 text
Or
Treatment 1 text _;_ Treatment 2 text.
Note that new Treatments will be added as text based Treatments. You cannot add a Treatment Task via import. You can however convert text based Treatments to Treatment Tasks, once you’ve imported the Treatment text.
Download a standard spreadsheet and copy across data
This is another method of updating your risk data which involves downloading a standard spreadsheet and copying across the data you’ve exported and converted. While this takes a bit more time to set up, it makes it easier to update and add risks accurately. This method is recommended if you are likely to be making a lot of changes to existing risks and adding new risks.
Download the Existing Risk Import spreadsheet & copy import data
Click here to download the Existing Risk Import spreadsheet . Copy the data you’ve exported and converted into this spreadsheet.

Format the Existing Risk Import spreadsheet
Some of the columns contain information which is normally populated from drop-down boxes. This means that the field must contain the exact wording that would be found in the drop-down box. The second sheet in the spreadsheet template named Dropdown box lists, gives you the opportunity to add this information so that you can populate these fields on the first sheet of the spreadsheet (shaded green) via dropdown boxes. You’ll need to replace the example data with the data which matches your instance. Go to a risk in the application and select the edit function to view the relevant data for your instance. Once you have replaced the Dropdown box lists with your instance data, you can use these drop boxes to update your risks. (Use the special paste function on your spreadsheet to copy and paste data validation into the relevant columns).
About the Existing Risk Import spreadsheet
Not all of the spreadsheet columns require information for the import to work. Some of the columns however are mandatory. The information below explains how each of the spreadsheet columns work. This information is also contained in the comments for each of the headings in row 1 of the spreadsheet.
Class
- Mandatory ie you must enter information in this column for each row.
- Use the Dropdown box to enter either Project or Programme depending on whether you are uploading the risks into a Project or Programme.
- This information is not uploaded, it is used to identify the initiative the risk belongs to.
Initiative Number:
- Mandatory ie you must enter information in this column for each row. (Note: if there is no Initiative Number, then the Initiative Name must be added instead.)
- This information is not uploaded, it is used to identify the initiative the risk belongs to.
Initiative Name:
- If you haven’t entered an Initiative Number, then this field is mandatoy.
- The text must be exactly the same as the Initiative Name in the application. If your Initiative Name doesn’t match the Initiative Number, then an error will be reported.
- This information is not uploaded, it is used to identify the project the risk belongs to.
Risk Number:
- Mandatory if you are updating existing risks. Leave this blank if you are adding a new risk.
- Content format can either be Risk Number alone (eg 1,2 etc) or the way the Number is displayed in the application which is Project Number-Risk Number (eg 1234-1, 1234-2).
- This information is not uploaded, it is used to identify existing risks, so that risk information can be updated.
Risk Name:
- Mandatory ie you must enter information in this column for each row.
- Adds or Replaces. For new risks, the name will be added. For existing risks, the name will replace the existing name.
Owner:
- Mandatory ie you must enter information in this column for each row.
- Exact content required ie the person’s name (eg Joe Bloggs) must be exactly as it is displayed in i-lign.
- Adds or Replaces. For new risks, the person’s name will be added. For existing risks, the name will replace the existing name.
Assigned To:
- Mandatory ie you must enter information in this column for each row.
- Exact content required ie the person’s name (eg Joe Bloggs) must be exactly as it is displayed in i-lign.
- Adds or Replaces. For new risks, the person’s name will be added. For existing risks, the name will replace the existing name.
Description:
- Adds or Replaces. For new risks, the text will be added. For existing risks, the text will replace the existing text. Note that if this cell is left blank and the risk curently has text entered in the Description field, then this text will be deleted.
Notes:
- Adds or Replaces. For new risks, the text will be added. For existing risks, the text will replace the existing text. Note that if this cell is left blank and the risk curently has text entered in the Note field, then this text will be deleted.
Resolve by end of Initiative: (Projects only)
- Only use for Projects. If you are uploading the risk to a Programme, leave this blank and make sure you complete the ‘Resolve By’ column.
- Text format is ‘y’ for yes and ‘n’ for no.
- If you enter ‘y’ here and you’ve also entered a date in the ‘Resolve By’ column, then the date you’ve entered in the ‘Resolve By’ column will be ignored and the date the initiative ends added instead.
- If you leave this and the ‘Resolve By’ cell blank, then the Project end date will be added by default
- Adds or Replaces. For new risks, the information will be added.
Resolve By:
- Mandatory for importing risks to Programmes.
- Also Mandatory for Projects, if you have entered ‘N’ in the ‘Resolve by end of initiative’ column.
- Note that for Projects, if you enter ‘Y’ in the ‘Resolve by end of initiative’ column, then this date will be ignored and the date the Project ends added instead.
- Date format is dd/mm/yy
- Adds or Replaces. For new risks, the date will be added.
Closed On:
- Date format is dd/mm/yy
- Adds or Replaces. For new risks, the date will be added. For existing risks, the date will replace the existing date. Note that if this cell is left blank and there is currently a date entered, then this date will be deleted.
Review On:
- Date format is dd/mm/yy
- Adds or Replaces. For new risks, the date will be added. For existing risks, the date will replace the existing date. Note that if this cell is left blank and there is currently a date entered, then this date will be deleted.
Type:
- Mandatory ie you must enter information in this column for each row.
- Populated from a drop-down box in i-lign. This means that information in this column must contain one of the options from the Type drop-down box. The wording used must be exactly the same. Go to a risk in i-lign and select the edit function to see what the options are for the Type field.
- Adds or Replaces. For new risks, the Type will be added. For existing risks, the Type will replace the existing Type.
Category:
- Mandatory ie you must enter information in this column for each row.
- Populated from a drop-down box in i-lign. This means that information in this column must contain one of the options from the Category drop-down box. The wording used must be exactly the same. Go to a risk in i-lign and select the edit function to see what the options are for the Category field.
- Adds or Replaces For new risks, the Category will be added. For existing risks, the Category will replace the existing Category.
Status:
- Mandatory ie you must enter information in this column for each row.
- Populated from a drop-down box in i-lign. This means that information in this column must contain one of the options from the Status drop-down box. The wording used must be exactly the same. Go to a risk in i-lign and select the edit function to see what the options are for the Status field.
- Adds or Replaces For new risks, the status will be added. For existing risks the status will replace the existing status.
Current Status:
- Adds or Replaces. For new risks, the text will be added. For existing risks the status will replace the existing status. For existing risks, the text will replace the existing text. Note that if this cell is left blank and the risk currently has text entered in the Current Status field, then this text will be deleted. The deleted text for the Current Status field will show in the Risk log though.
Trigger:
- Adds or Replaces For new risks, the text will be added. For existing risks, the text will replace the existing text. Note that if this cell is left blank and the risk currently has text entered in the Trigger field, then this text will be deleted.
Likelihood level (I):
- (I) refers to Inherent which is the Consequence Level before Controls or Treatments are applied.
- Populated from a drop-down box in i-lign. This means that information in this column must contain one of the options from the Likelihood Level drop-down box. The wording used must be exactly the same. Go to a risk in the application and select the edit function to see what the options are for the Likelihood Level field.
- Adds or Replaces. For new risks, the Likelihood level will be added. For existing risks, the Likelihood Level will replace the existing one. Note that if this cell is left blank and there is currently information entered in the Likelihood Level field, then this will deleted. As well as no longer showing this information, this may also result in the overall Risk Level changing. (The overall Risk Level is calculated by the system, based on Likelihood and Consequence levels.)
- Risk level changes will show in the Risk Log.
Likelihood level (R):
- (R) refers to Residual which is the Consquence Level after Controls or Treatments are applied.
- Populated from a drop-down box in the application. This means that information in this column must contain one of the options from the Likelihood Level drop-down box. The wording used must be exactly the same. Go to a risk in the application and select the edit function to see what the options are for the Likelihood Level field.
- Adds or Replaces. For new risks, the Likelihood level will be added. For existing risks, the Likelihood Level will replace the existing one. Note that if this cell is left blank and there is currently information entered in the Likelihood Level field, then this will deleted. As well as no longer showing this information, this may also result in the overall Risk Level changing. (The overall Risk Level is calculated by the system, based on Likelihood and Consequence levels.)
- Risk level changes will show in the Risk Log.
Likelihood Analysis:
- Adds or Replaces. For new risks, the text will be added. For existing risks, the text will replace the existing text. Note that if this cell is left blank and the risk currently has text entered in the Likelihood Analysis field, then this text will be deleted.
Consequence Level (I):
- (I) refers to Inherent which is the Consequence Level before Controls or Treatments are applied.
- Populated from a drop-down box in the application. This means that information in this column must contain one of the options from the Consequence Level drop-down box. The wording used must be exactly the same. Go to a risk in the application and select the edit function to see what the options are for the Consequence Level field.
- Adds or Replaces - For new risks, the Consequence level will be added. For existing risks, the Consequence Level will replace the existing one. Note that if this cell is left blank and there is currently information entered in the Consequence Level field, then this will deleted. As well as no longer showing this information, this may also result in the overall Risk Level changing. (The overall Risk Level is calculated by the system, based on Likelihood and Consequence levels.)
- Risk level changes will show in the Risk Log.
Consequence Level (R):
- (R) refers to Residual which is the Consquence Level after Controls or Treatments are applied.
- Populated from a drop-down box in the application. This means that information in this column must contain one of the options from the Consequence Level drop-down box. The wording used must be exactly the same. Go to a risk in the application and select the edit function to see what the options are for the Consequence Level field.
- Adds or Replaces - For new risks, the Consequence level will be added. For existing risks, the Consequence Level will replace the existing one. Note that if this cell is left blank and there is currently information entered in the Consequence Level field, then this will deleted. As well as no longer showing this information, this may also result in the overall Risk Level changing. (The overall Risk Level is calculated by the system, based on Likelihood and Consequence levels.)
- Risk level changes will show in the Risk Log.
Consequence Analysis:
- Adds or Replaces. For new risks, the text will be added. For existing risks, the text will replace the existing text. Note that if this cell is left blank and the risk currently has text entered in the Consequence Analysis field, then this text will be deleted.
Relevant Controls:
- Adds or Replaces For new risks, the text will be added. For existing risks, the text will replace the existing text. Note that if this cell is left blank and the risk currently has text entered in the Relevant Controls field, then this text will be deleted.
Confidence:
- Adds or Replaces. For new risks, the text will be added. For existing risks, the text will replace the existing text. Note that if this cell is left blank and the risk currently has text entered in the Confidence field, then this text will be deleted.
Assumptions:
- Adds or Replaces. For new risks, the text will be added. For existing risks, the text will replace the existing text. Note that if this cell is left blank and the risk currently has text entered in the Assumptions field, then this text will be deleted.
Evaluation:
- Adds or Replaces. For new risks, the text will be added. For existing risks, the text will replace the existing text. Note that if this cell is left blank and the risk currently has text entered in the Evaluation field, then this text will be deleted.
Treatment Required:
- Text format is ‘y’ for yes and ‘n’ for no.
- Adds or Replaces. - For new risks, the information will be added. For existing risks, the information will replace the existing Treatment Required information. Note that if this cell is left blank, it will default to ‘n’ for no.
Treatments:
Adds or Replaces. For new risks, the text will be added. For existing risks, the text will replace the existing text. Note that if this cell is left blank and the risk currently has text entered in the Treatment field, then this text will be deleted.
If you are adding more than one treatment, separate the treatments with a space or new line followed by underscore semicolon underscore then a space or new line eg:
Treatment 1 text
_;_
Treatment 2 text
Or
Treatment 1 text _;_ Treatment 2 text.
- Note that new Treatments will be added as text based Treatments. You cannot add a Treatment Task via import. You can however convert text based Treatments to Treatment Tasks, once you’ve imported the Treatment text.
Custom fields:
- If your organisation has added custom fields to risks, then you can add these fields as columns on your spreadsheet.
- The name of the column must be exactly the same as the custom field name in the application. Go to a risk in the application and select the edit function to see what, if any, custom fields have been added.
- Information contained in custom fields is added or replaced. For new risks, Custom field text will be added. For existing risks, the text will replace the existing text. Note that if a cell is left blank and the Custom field currently has text entered, then this text will be deleted.
Convert your spreadsheet into a csv file.
Don’t forget to remove the current example content from row 2. Download the Existing Risk Spreadsheet as a csv. You are now ready to import your risks into your project. .
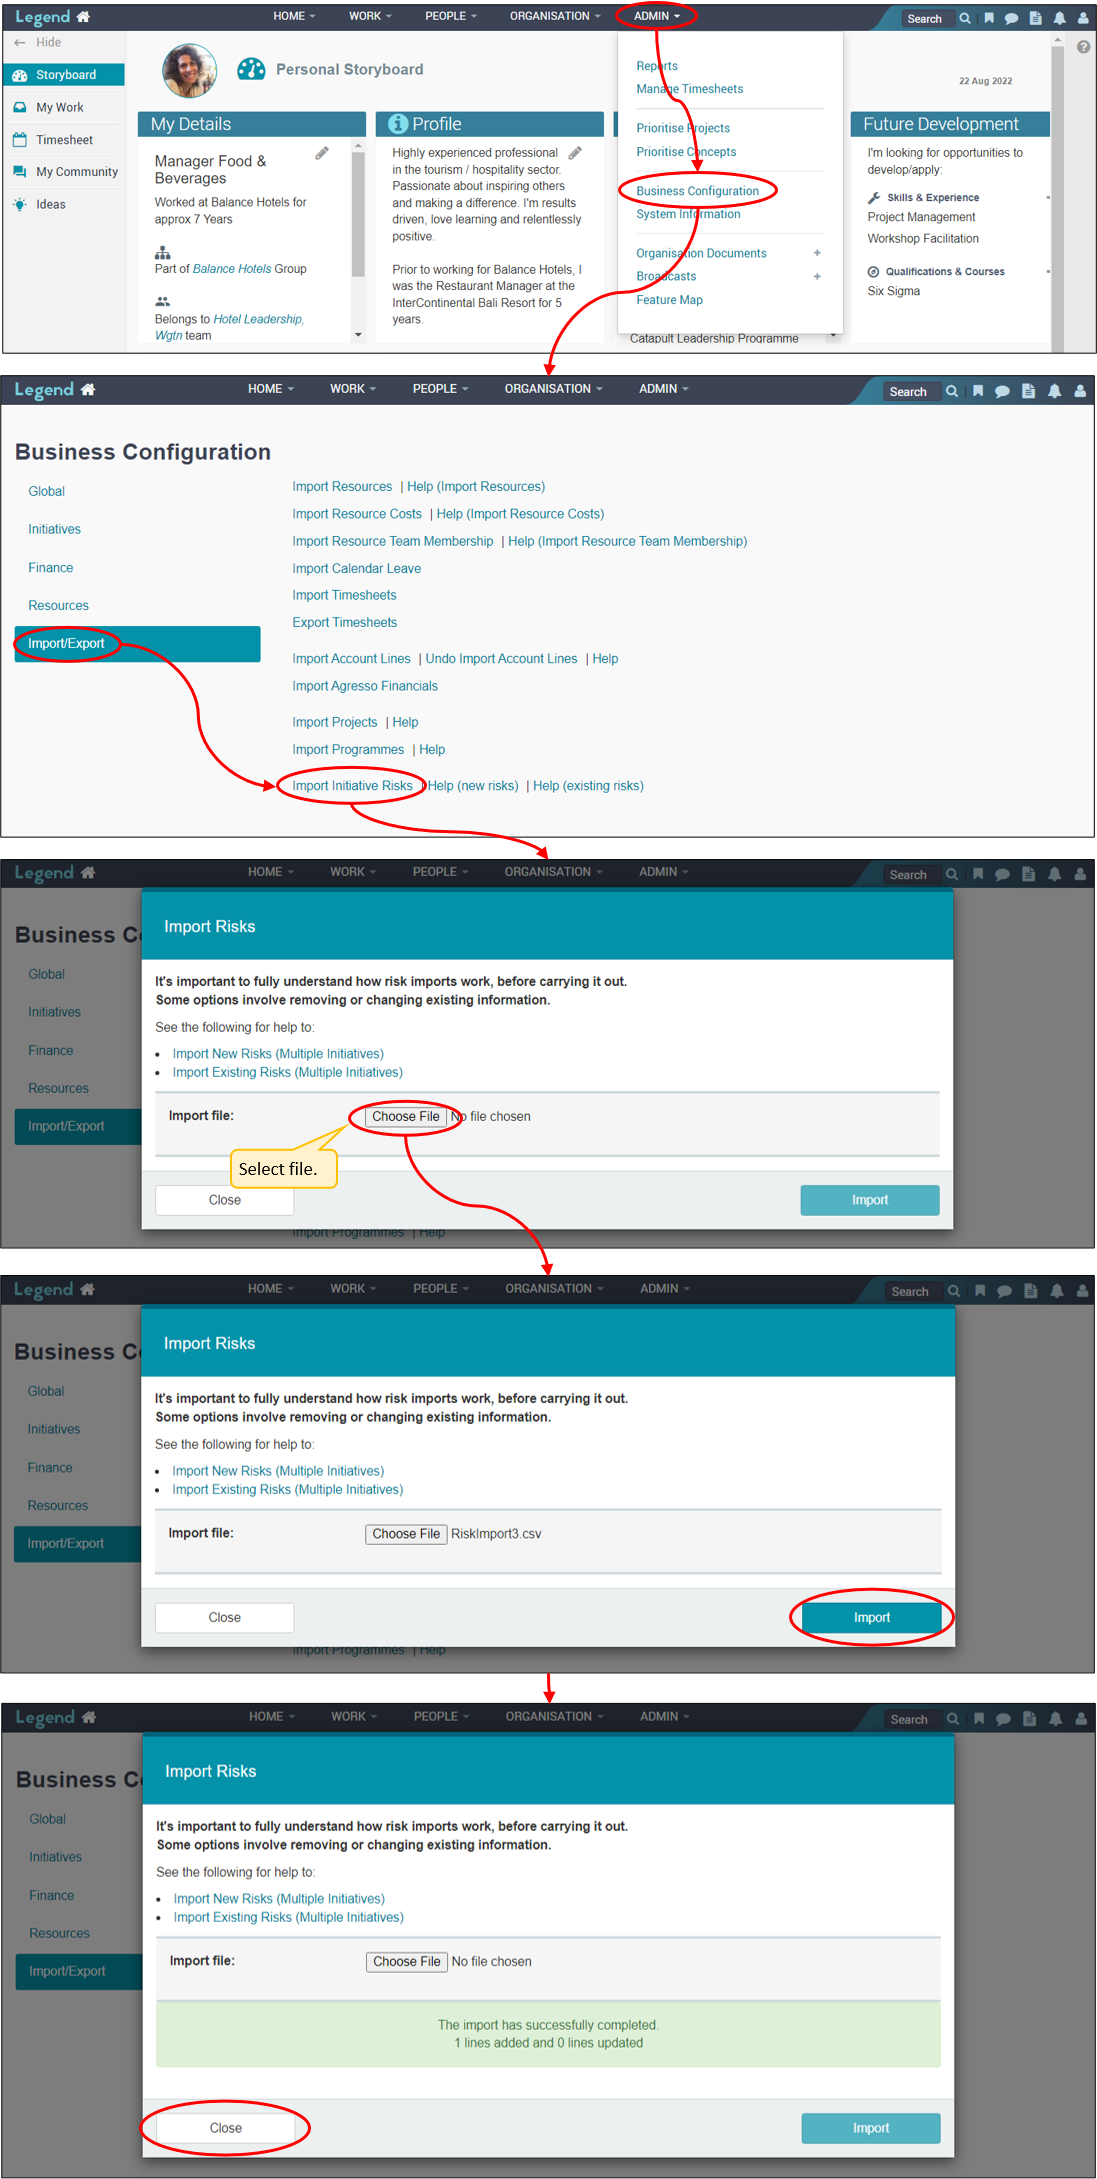
Import your csv file